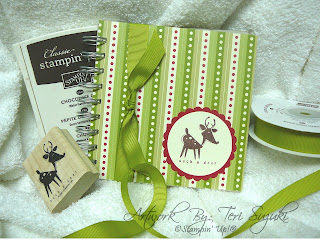
 Use designer series paper and a spiral punch to create a cover for your 5X5 on board journal. The instructions were provided to me courtesy of one of my stamping sisters from Stamped with Aloha - SU demonstrator, Tara Takatsuka - thanks Tara!! It really worked!! I love it!
 With a scissors, slit the mark you just made from the edge, about 1/4".
Line up the right edge of the punch with the slit you just cut and punch with the spiral punch. You will end up with two holes to the left of your slit. 

To get a hole where the slit is, flip the paper over so that the slit is on the left.
Line up the right hole with the punch edge so you are only punching the hole where the slit is (you will be re-punching the other two holes you already made). Ta-da! This is what your paper should look like if you punched it correctly. I tested this out using junkie paper so I wouldn't waste my precious designer paper!
Then turn the paper back so the holes are on your right again (how you started) and punch the rest of the holes.
Then turn the paper back so the holes are on your right again (how you started) and punch the rest of the holes.

I used the SU anywhere glue stick to adhere the ds to the book. Here's the rest of the ingredients I used to make the completed project: *Moose You* stamp set, chocolate chip ink pad, Dashing designer paper, spiral punch, 5/8" old olive grosgrain ribbon, real red and very vanilla cardstock.
Thank you all for patiently waiting for me to do this tutorial! If any of you give it a try, please be sure you share with me your book!


